Ever since I posted the video tour of our RV on Youtube, I get regular question about our RV Water Filtration setup.
I finally made a video that shows our RV Water Filtration Setup in Detail. In the video I discuss RV Water Pressure Regulators, RV Water Filtration, Reverse Osmosis and more. I recommend watching the video first and then reading through the article for RV Water Filtration and RV Water Filter details and recommendations.
Video Of Our RV Water Filtration Setup
RV Water Pressure Regulators
First things first – why do you need a water pressure regulator?
The simple answer is that most RV water lines are designed to handle no more than 100psi. Many RV parks have low enough water pressure that you don’t need a regulator, however plenty have very high water pressure that can burst RV water lines. It would be horrible to have your RV spring a leak – especially in an enclosed area or when you’re not there. A bad leak could cause permanent water damage to your floor, cabinets, walls, storage bins, and anything stored in any of those locations.

Therefor the ‘better safe than sorry’ solution to this is to always use an RV Water pressure regulator.
When we first purchased our RV we received a box of starter RV accessories. One of the items included was a basic pressure regulator from Valterra like the one pictured here.
There are 2 problems with standard inline water pressure regulators:
1. Cheap Inline Water Pressure Regulators are usually set to 40 – 50psi. This is unnecessarily low, and makes for a weak shower unless you’re using an Oxygenics Shower Head (read our Oxygenics Showerhead Review →).
2. In-line regulators aren’t designed to be cleaned or maintained easily. Over time they clog up with dirt, calcium, and lime deposits – which means you’ll need to buy a new regulator. In the meantime, you’ll struggle with increasingly low water pressure.
I’m speaking from experience as we went through two of these models (a Valterra and then a Camco unit) before I purchased our current adjustable water pressure regulator. More on that below.
Recommended Water Pressure Regulators for Part Time RVers:
That said, if you’re a part-time RVer and you don’t want to spend extra for an adjustable pressure regular, then the next best thing is to use a high-flow water pressure regular like those I show here. The Stainless Steel unit is better as it will resist build up and corrosion better and longer than the Brass unit – but that’s just in my experience.
I’ve used both of these units and can recommend them. Either unit should last a part-time RVer for at least a few years.
You’ll also notice a bunch of inexpensive off-brand pressure-regulators on Amazon. I don’t have experience with them and don’t see the value in using a no-name product just to save a couple bucks – but that’s me.

This high-flow Camco unit is constructed of Stainless Steel and designed to allow 50 – 60 PSI of water pressure. This is a much better option for those that want decent shower pressure.
View Camco high-flow price on Amazon

The Valterra high-flow water pressure regulator bumps pressure up to 50 – 55 PSI and is constructed of brass. The brass units are about half the price of the stainless steel units, but typically need to be replaced more often, so some of that will depend on your use.
View Valterra high-flow price on Amazon
Water Pressure Regulator Recommendation for Full-Time RVers
As a full-time RVer I don’t want to have to continually replace water pressure regulators so it makes sense to get a quality unit that will last a long time. Also – the last thing I want to think about while RVing is water pressure! I just want the shower, sink and toilet to work as designed, and I don’t want to have to think about it. As a result it felt like a no-brainer to upgrade to a quality adjustable water pressure regulator. I love the ability to set the water pressure to a specific PSI (60psi = perfect to me) and it completely changed the experience of taking a shower in our RV.

The unit I use and recommend is the Renator M11-0660R Water Pressure Regulator. This unit is constructed of brass (lead-free) and it’s adjustable to 160PSI. It also includes a one-year warranty and the price is very reasonable. As mentioned I usually set ours to 60psi, and it’s a set it and forget it type water pressure regulator in that you don’t need to adjust it each time you use it.
That said, I did find that at certain RV parks adjusting the water pressure helped the shower pressure. Some parks have very low pressure, and any regulator will limit the pressure even more, so opening the Renator fully helped prevent any water throttling.
View the Renator Adjustable Water Pressure Regulator Price on Amazon →.
I think adjustable water pressure regulators are basically a requirement for all RVers, but it’s a must (in my opinion) if you full time. It’s the closest you can get to house water flow while still protecting your RV, without using your water pump at the same time.
I keep mine permanently mounted to the inlet side of my water filtration system and connect the hose directly to the pressure regulator when hooking up. As I mentioned above, in an ideal world I’d mount the pressure regulator before the hose, as this would protect the hose from high water pressure.
Personally I feel more comfortable keeping my pressure regulator in a locked garage compartment. It would be very easy to steal it if it were mounted outside – not that there’s a lot of theft at RV Parks, but there is some (we had a bike stolen last year).
Ok, I think that’s enough about Water Pressure Regulators – on to water filtration!
RV Water Filtration
I’m a firm believer that every RVer should filter the water that comes into their RV. This isn’t because I’m a health nut, or because I think city water will kill you (although a lot of city water is questionable), but has to do with your RV itself.
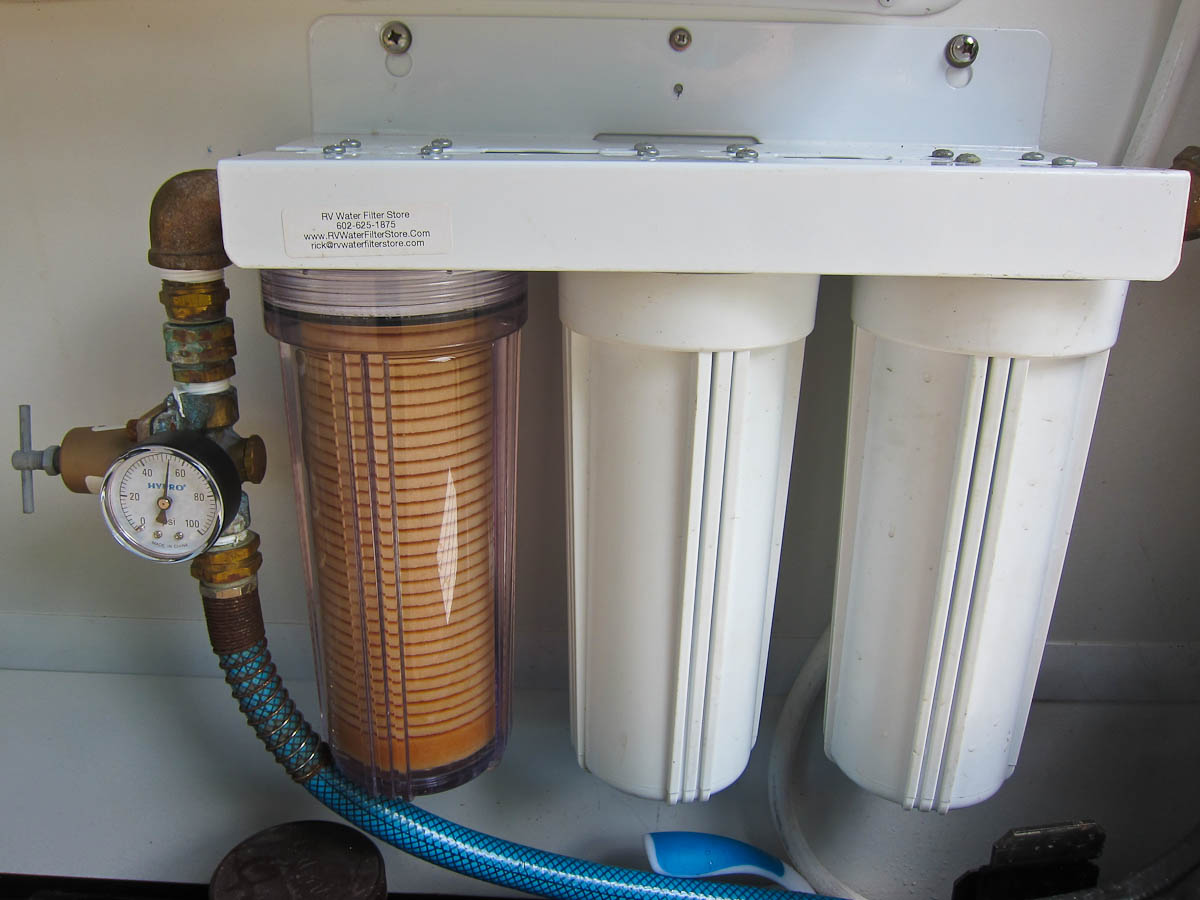
See that picture of our water filter system? See the clear canister with the brown water filter inside? That filter was bright white only a couple months ago. We’ve been hooked up to city water the entire time, and yet a 5-micron filter has filtered that brown gunk from ‘drinking’ water!
Without a filter, those particles would mostly have run through the RV and down the drain, but some of them would have collected and built up in the RV water pipes and our water-using fixtures – not to mention that we’d be drinking them. Consider that this is after a couple months, and imagine the amount of sediment that would collect in the RV water pipes and fixtures after several years.
When you weigh the cost of replacing water-using fixtures like your toilet, faucets, water pump, and water heater – and worse, trying to find blockages in your water lines, not to mention the fact that you’re cooking, drinking, and showering in that water, the costs and benefits of a basic water filtration system are a no-brainer.
RV Water Filtration Recommendation for Part-Time RVers
The big considerations for water filtration when you’re a part time RVer are cost, effectiveness, and filter reusability as it’s unlikely that you’ll get maximum use out of a filter during a two week vacation – and certainly won’t on a weekend trip.
Reusability is an important consideration as most water filters are designed to be used continuously. If they’re left in stagnant (non-moving) water, or if they’re removed and stored wet, they’ll grow bacteria, algae, and other stuff that you don’t want to drink.

That’s why (assuming you plan to reuse your filter) it’s very important that whatever filter you use is bacteriostatic – which means that it prevents bacteria from reproducing. This is different than anti-bacterial substances which are designed to kill bacteria. Your body requires bacteria to function properly, so you don’t want to consume anti-bacterial substances.
My recommendation is to use a Camco TastePure inline water filter. These are probably the most common water filter I see in RV parks. I think it’s a good option for part timer RVers, however it has several drawbacks which I’ll explain below.
The benefits of the Camco Filter are that it’s easy to install (if you install it right at the post it’s helpful to use a 90 degree Camco Elbow), it’s relatively inexpensive, and most importantly the Camco Filters are bacteriostatic so they won’t grow bacteria and can be reused across many RV trips.
Camco accomplishes this by using KDF. Taken from Wikipedia: “KDF is known to kill algae and fungi, control bacteria growth, remove chlorine, pesticides, organic matter, rust, unpleasant taste and odor, hydrogen sulfide, iron, lead, nickel, chromium, cadmium, calcium, aluminum, mercury, arsenic, and other organic compounds . . . KDF is optimized when used in conjunction with another filter media, especially any form of activated carbon.”
The 3 Drawbacks to the Camco Inline Filter:
#1 – The Camco Filter is only rated down to 100 microns. That means it won’t filter microbial cysts like cryptosporidium (between 3 and 6 microns) and giardia, although you probably don’t need to worry about those in United States drinking water. It also means any particle smaller than 100 microns will pass through the filter, and unfortunately the majority of particles in tap water are small and will pass through.
#2 – As the Camco filter uses KDF, and KDF uses granulated carbon (vs. solid block), about half the chlorine will get through the filter. 50% is an improvement that you can taste, but it’s still worth noting.
#3 – The Filters Clog up Relatively Quickly. As the filter is trying to do everything (vs a multi-canister system) they can clog up after a month or so. I’ve read anywhere from 30 – 45 days of use (maybe 60?). This depends (of course) on how much water you use and how good your source water is.
In spite of these issues, the Camco water filter is still the fastest, cheapest, and easiest way to filter water and it’s probably the best option for most RVers. Note that Camco also has a premium version called the EVO Premium filter which I’ve linked to below. This unit does work better and last longer than their inline filter.
As a full-time RVer myself I quickly came to the realization that an inline water filter wasn’t going to cut it. The filters don’t do a good enough job, and considering they clog up after 30 – 45 days of use, they get expensive in a hurry. As such I decided to purchase and use the 3-canister system you see at the top of this article. Read on for my thoughts and recommendations for 2 and 3-canister filtration systems.
RV Water Filtration Recommendation for Full-Time RVers
A lot has changed since I originally wrote this article – including a couple of my recommendations. First, if you’re interested in a premium RV Water Filtration solution, then read my ClearSource RV Water Filter Review. Clearsource makes the most robust RV Water Filter System I’ve used, and it’s free-standing design is good for any RV – as long as you can fit it in storage. That said, it’s expensive, so I’ve listed some less expensive and still good options below as well.
Note that even though our system was 3 canister, I recommend a 2 canister system to most RVers. In 6+ years of RVing, I’ve only rarely used the 3rd canister, so I consider it unnecessary. All the systems below include a set of filters (sediment + carbon), although some filters are better than others. I can vouch for the quality of the Clearsource unit, and the white 2-canister filtration system listed is similar to the unit we used for 6+ years.

In retrospect I think a 2 canister system like this is a good starting point for most RVers. It has a small footprint and can be installed almost anywhere. Most also includes a particle and carbon filter. These are inexpensive system – and I haven’t used them so I can’t vouch for any specifically.
View 2-Canister Water Filter Prices

This is the updated version of our exact system. We purchased directly from RV Water Filter Store, however they also sell their filtration systems through Amazon. They’re good quality, although not as robust as the Clearsource Units.
View RV Water Filter Store 3-Canister System

Clearsource water filters use the most robust hardware and fittings I’ve seen. The high-quality does come with a premium price. These units are available with 2 or 3 canisters.
View Clearsource Premier 2-Canister Price
View Clearsource Premier 3-Canister Price
Water Filters

Once you have a canister system, the next question is what filters should you use? My recommendation is to buy a pack of 1-micron sediment filters from Amazon for the first canister. These will last for a while in some parks and not-so-long in others which is why it’s good to carry a few. They also weigh next to nothing when dry.
The 2-pack price is better than buying individually, and each filter should last 2 – 6 months. In my experience 1 micron filters don’t inhibit water flow, plus they remove almost everything from the water that isn’t in solution (dissolved), including microbial cysts.
These filters will do a much better job at removing sediment than the Camco unit, and a 3-pack should last 6 months to a year if you full time.
For the second filter there are two good options. First, a combination KDF/Granulated Activated Carbon filter like this 10 micron KDF 55 unit is a good option. It’s expensive, but should last up to 2 years and has KDF so it’s perfect for intermittent use. This is also a good filter for a part-time RVer as it uses KDF so is bacteriostatic.
An even better option (in my opinion) is a Compressed Carbon Block Filter →. This filter won’t last as long as the KDF unit, but block carbon filters do a much better job of removing chlorine and bad taste than granulated activated carbon.
Note that a .5 micron filter like the Pentek I’ve linked to here may slow water flow a bit – and if that’s a concern than stick with the 1 micron activated carbon unit I linked to above.
3-Canister System Filter Options
If you do chose to install a 3-canister water filtration system like ours, then you have even more filter options. You can use a 10 or 5 micron pre-filter, then a 1 micron filter, and finally a carbon filter for taste and odor.
Alternatively you can stick with the 1 micron sediment filter and a carbon filter and add a speciality filter. Specialty filters are designed to perform specific functions including:
De-ionization Cartridges – designed to remove trace minerals from water using resin beads. These tend to be low-flow units, so you’ll need to fill your fresh water tank and then use the water from there.
Birm Cartridges – remove iron and manganese. Both metals impact the color and taste of your water.
Phosphate Cartridges – As an alternative to a water softener, phosphate cartridges reduce lime and scale buildup in your water heater and RV. They do this by releasing small amounts of phosphate that coat your water lines and system and prevent lime and scale from forming. Yes, they add a little phosphate to your water. This may be preferable to a water softener, as water softeners add sodium to your water instead.
Activated Alumina Cartridges – remove flouride and arsenic-5 from your water (not arsenic-3 – you’ll need a different filter for that.).
Nitrate Cartridges – remove nitrates from water.
There are many more specialty filters, but this will at least give you an idea of what’s possible. The more you learn about water filtration the more there is to learn – and the more you realize how much stuff can potentially be in your water! Don’t worry, most ‘city’ water in the United States is tested and clean enough. Most specialty filters are designed to address regional water quality issues – especially for well water. In general I don’t think you’ll need them which is why I recommend a 2-canister system.
Reverse Osmosis for RVs
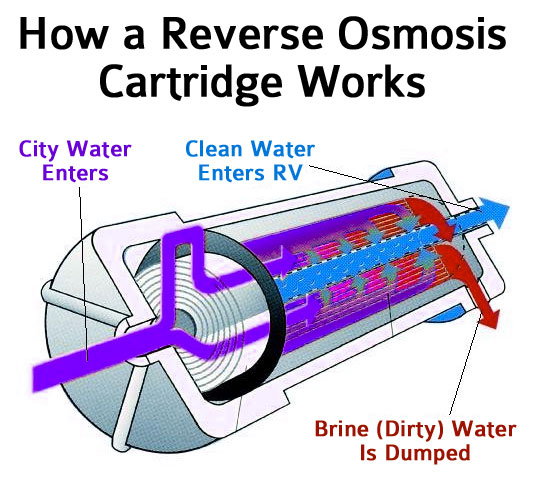
Reverse osmosis (RO) is the process of forcing water through a semi-permeable membrane as a means of producing ‘pure’ water. In the case of RV reverse osmosis the water won’t be 100% pure, however RO will clean the water better than any filter and removes most lime and calcium without the use of a water softener.
Reverse Osmosis systems are fairly expensive. If you’re starting from scratch plan on spending $300 for a ‘standard’ setup, and as much as $500 for an automatic setup.
RO systems require 3 components:
#1 – RO canister and membrane cartridge. This usually costs around $100. You’ll need to periodically replace the RO membrane cartridge (around $70) for best results, as their performance degrades over time.
#2 – A filtration System. For best results you need to start with the cleanest water possible. It’s recommended that you use both a particle/sediment filter and a solid-block carbon filter before the RO cartridge. Pre-filtering will make the (expensive) membrane cartridge last a lot longer.
#3 – A boost pump. RO requires high water pressure, so if you live in a high pressure area you can skip this part – but if you move around (full timers), then a boost pump is a must to ensure proper function of the RO system.
There are many other components that can be added to an RO system, including automatic system on/off switches with water tank sensors and water meters to check for water purity.
Why don’t I recommend Reverse Osmosis for RVs?
Originally I was very interested in adding RO to our RV, right up until I learned about brine. Brine is another name for the water that doesn’t make it through the RO membrane, and it contains the particles and contaminants that were removed from your water. Sounds great, right?
The problem with brine and RO is that under ideal conditions only 20% to 30% of the water that enters the system becomes clean water. That means that 70% to 80% of the water goes right down the drain!
This felt like much too big a waste of water to me. We use about 20 gallons of water a day between showers, washing dishes, and drinking water. I wouldn’t want to waste between 60 and 80 gallons of water to get those 20 gallons of water.
The Other Problem with Reverse Osmosis
There’s a second problem with Reverse Osmosis – even though water is being forced into the membrane at high pressure, because only 20% – 30% of the water makes it through the membrane it comes through at very low pressure.
That means that instead of running water directly into your RV, you need to store the water in your fresh water tank and then use your RV’s water pump to use the water. This will add to the expense of your system as most standard water pumps are more suitable for occasional dry camping than full-time use. An upgraded water pump – like those from Aquajet – will cost another $160.
If you want Reverse Osmosis Anyway
A good option is to use a standard filtration system for your entire RV, and then use a smaller RO system (such as the one listed here) at your sink for drinking and cooking water. This will dramatically cut down on water waste while still giving you clean drinking water.
Another excellent option is to use a countertop distiller like the Megahome countertop water distiller. These units produce up to 4 gallons of distilled water every day, so you’ll have plenty of drinking water, water for your coffee, and even water for cooking.
The drawback to countertop distillers is that they only produce one gallon every 6 hours and they’re still fairly expensive, but at least they waste very little water and they produce even cleaner water than Reverse Osmosis. Decisions decisions!

RO systems do take up quite a bit of space unfortunately. This system is about as small as it gets and supplied clean drinking water.
View Reverse Osmosis System price

Countertop Distillers take up less space than a Reverse Osmosis system, but they only supply 4 gallons of water a day. Plenty for drinking as long as you keep the system running.
View Megahome Water Distiller price
RV Portable Water Softeners
Hard water is water that’s high in mineral content – specifically calcium, lime, and magnesium. You can tell if you have hard water by simply washing your hair. Shampoo doesn’t get sudsy in hard water. Alternatively if you boil a pot of water you’ll see white and greenish particle drop out of solution and form a crust on the side of the pot/pan if you’re in a hard water area.
Normal water filters can’t remove these particles from water because the calcium and lime is fully dissolved in the water. That means there are no particles to filter – much like if you run salt water through a filter it will still be salty. If you remember back to Chemistry, this is what’s known as being ‘in solution’. The calcium is literally part of the water.
The big problem with hard water is that it leaves mineral buildup – known as scale – on everything. It lines your pipes, coats the inside of your water heater, sits in your fresh water tank, and will clog your pipes as chunks of it come loose.
We lived in our RV in California for a year, and California has notoriously hard water. When we left the state, chunks of scale broke free from wherever they’d been lodged (mostly in the water heater) and clogged EVERYTHING. Our sinks stopped working, our toilet water lines clogged, our shower plugged up, etc.. I was able to remove most of it from our system, but had to open up a bunch of water lines to dump out the chunks of scale, and had to backflush/drain the system several times.
If I had known at the time, I would have used a portable Water softener to prevent this from happening.
July 2017 update – We Added an On The Go Portable Water Softener
I’ll be adding a review of our water softener in the future – but for now, here’s a picture of our water softener tucked into the ‘garage’ of our RV.

How Water Softeners Work
Water softeners remove hard-water-causing minerals from water by using thousands of small negatively charged polystyrene beads. The beads need to be regularly ‘charged’ with salt to work.
When your water softener is charged, you then connect it to your inlet water and the hard water moves through the softener. As the hard water moves past the beads, the sodium (salt) is swapped with calcium and magnesium because calcium and magnesium have a stronger positive charge than sodium. This means you’ll have small amounts of salt in your water – a potential concern if you have high blood pressure – but it removes the minerals that cause scale.
You’ll notice the difference right away as your hair and skin will feel softer after a shower and soap will do a better jobs of washing your dishes – plus you won’t have scale forming on all of your appliances including your coffee pot.
Water Softener Drawbacks
The drawback to water softeners is that they need to be regularly recharged as mentioned above. You do this by ‘regenerating’ the softener with a salt water solution. You use enough salt water that it overcomes the bond of the minerals and the resin beads and washes the minerals out of the softener. In the process salt bonds with the resin beads, and then you’re ready to use your water softener again.
Fortunately this is a simple process. You simply dump a container of salt (cheap) in the softener, and then run water in the opposite direction through the unit. An adapter is included specifically for attaching the host the other way.
The water that you flush through the softener should be dumped down the sewer pipe as it’s salty and full of minerals.
RV Water Softener Recommendations
On The Go makes excellent quality RV Water Softeners. We use their 8000 grain unit which is pictured here and paid full price for it. They also make a larger 16000 grain unit that costs about the same. The larger unit is ideal if you can fit it! After install we noticed a dramatic improvement in the shower and sink water and recommend this as an upgrade to all RVers.

I hope you found this post useful. I did my best to condense a LOT of information into a relatively small space and include helpful links to recommended products (these are sponsored/affiliate links, but they’re also the products we’ve used and tested ourselves).
Many RV parks have sketchy water, so I hope this post inspires you to add water filtration to your RV. At the very least always use a water pressure regulator! Good luck out there, and happy trekking.


Finally, an intelligent and well-researched article about RV water filter choices, written without the tortured English and meaningless generalities of other reviewers. I immediately placed an order with Clearsource for the Ultra, due to the fact that my wife has acquired immune deficiency, allowing us no room for error in water hygiene. I am a life-long backpacker who has followed the evolution of filtration systems for that environment. I’ve watched strangers on the trails who have contracted giardiasis. I am new to trailering but I know that water sources, even public utilities, are suspect today and it’s simply not worth the risk of insufficient filtering/treatment. I will now be watching for other topics you may cover. Thanks for your contribution to the greater good.
Hi Jim – thanks for your comment. The Clearsource is an excellent unit. Very well constructed and solid. I was sent an early unit and did a complete review of the product here: https://www.trekwithus.com/clearsource-premium-rv-water-filter-system-review/. You may have inspired me to start writing again. Happy travels!
I agree that this is the first well written and well video taped article on filtration. I have scoured YouTube for three days and finally found what I needed. Kudos to you.
Hi…just to confirm…you soften the water before it hits the filters or after. I ordered all the stuff and want to clarify that. Thanks for all the information!
Hi Paul – I run the water softener before it hits the filters. That keeps the filters and canisters from getting hard water build up. Good luck!
Thank you for the informative article. As a part-time RV enthusiast with a tent trailer, hot water heater and outside shower, we’ve been using the CAMCO blue inline filter with our fill hose into the main tank. We boondock or use NF campgrounds mostly, so no problem.
But now we’re heading for a month in Baja, Mexico. We plan to avoid city water hookup, and use the existing filter when filling the tank, but adding chlorine to the tank for disinfection. I purchased an Everpure single filter that will do a good job on chlorine, cysts and bacteria, but it has a flow rate of 0.5 gal/minute.
When home in Colorado, I would probably bypass this addition, but I would ask if, while in Mexico, you think it would restrict my shower pressure too much, or if I should simply install it in line behind the water pump (3 gal/min) and go for it?
This is not the time of year for me to do “testing” at home in freezing weather…
Thanks for any response!
Hi Brian – A 0.5 gal/minute filter will slow the flow rate too much to take a shower under outside water pressure – but it’s fine for filling your tank and then using your water pump to take a shower from the fresh tank. Have a great trip!
Is it better to have your water softener before or after your double canister water filter system?
Hi Kris – I put the water softener before the canister system. Otherwise your water filtration/canister system will get plugged up with hard water deposits. Good luck!
We have a Tiffin 2010 Allegro Bus. I’d like to put in a two stage filtration system but there is no room for a 12″ wide plus fittings system in our wet bay (there is an existing one stage installed). In addition, I’d like to install a soft water system, but again, there is no room in the wet bay. Where do all the Tiffin owners put these filters?
Hi Gary – You could consider bringing a 2 canister system like the Clearsource 2-Stage Premium Water Filter System → (click for my review).
Hi Rich,
More kudos for your article and for your responses.
We are part timers and it’s just her and I. We are thinking of getting the Camco TastePURE Water Filter and Mobile-Soft-Water Portable Softener.
My plan is to go from spigot to the regulator to the filter to the softener to a “Y” then to the city inlet. The other line will be used to fill the holding tank with filtered, conditioned water.
Do I have it right? Also, we’ll buy have a spare filter for when it eventually clogs but when will we know the softener needs to be recharged?
Thanks again!
Chris and Sheri
Hi Chris – Thanks! Ideally, yes, you’d run the water regulator first, but I don’t. I use a watts adjustable, and prefer to keep it locked in the rear garage, so our setup goes: – spigot – hose – water softener, pressure regulator, water filtration, inlet. Our way works fine, and your setup should work great.
I have to get my review of our Portable Water Softener (This one: https://amzn.to/2HkSsDt) online soon, as we’ve been using it for almost a year now. There are two ways to tell when it needs to be recharged. You can calculate water usage by size of your holding tanks and how long it takes to fill them – and the water softener tells you how many gallons of water it can soften (approximately). Or you can actually FEEL the soft water, and I can tell when it’s not as soft. Right when you ‘recharge’ the water softener, the water from the faucet/shower feels really slippery. Almost like you can’t wash all the soap out of your hair, or rinse it all off your hands. That’s what ‘soft’ water feels like. When it stops feeling that way, it’s time to recharge. I do a little bit of both, because some parts of the country have harder water than others, so the real time between recharge can vary quite a bit.
Happy travels to you both!
-Rich
This is great. All of a sudden hot water is coming out of our water filter tap (should be cold…) – has me baffled…
Hi Ally – That’s not good! If the faucet itself wasn’t hooked up backwards, then sometimes this is a result of using the outside shower and instead of turning it off at the valve, the shower head has a switch that allows it to be turned off while the valve is still open. As it’s still technically on, all the water from the RV can now move into either hot or cold lines through the outside shower, and that can cause warm/hot at other faucets. Just a stab in the dark here, but I’ve seen this happen before. Good luck!
This is the most informative piece I’ve read on this topic. Thanks for your work on it.
I’m new to the RV thing and am soon (ish) going to start building out a van and I have a fantasy of getting a hose, pump, and very good filter so that I can fill my potable water tank from lakes or streams. The question is this: What sort of filter will deal with that kind of thing. Free standing or flowing water is going to have much more in the way of biological contaminants as well ans chemicals and heavy metals that would need to be filtered out and most of these filters seem to be an either/or sort of scenario where I have to choice what poisons to drink?
Based on your flow regulator information (which I had not seen before. Thanks again for saving my not yet built water system) It would probably go in something like this order: hose with particulate filter to pump to flow regulator to filter to fresh water tank.
What are your thoughts on this?
I should also probably mention that this is going to be a very small system; I’m going to be building out a standard cargo van.
The system I linked to is for an under-sink RO system. It should fit.
Hi Nicholas – I apologize for the delay in responding. I missed your comment the first time. If you’re going to fill from lakes or streams then you need a full Reverse Osmosis system with Ultra Violet (to kill viruses). Something like this system – http://amzn.to/2DIcxEf – should be able to filter just about anything from anything. Don’t scrimp on this – you can easily make yourself really sick drinking lake or stream water. Good luck!
Hi! Thanks for all your information! We have been full-time for 3 months now, and it is time for me to upgrade the water filtration! I am thinking a 3 canister system. I am also going to do a softener. However, I really don’t want to mess with RO for drinking and the ice machine. What are your thoughts on UV? I see the rvwaterfilter store has some, but they do limit flow.
Hi Jason – my understanding is that UV is only useful for killing bacteria and viruses. If you’re in the United States & Canada it’s overkill as there are no bacteria or viruses in city water. Speaking of water softeners, we purchased on a little while back. Review coming soon!
Rich: I read your article above and found it informative. I am a manufacturer of microbiological water filters and would like to discuss these topics further and get your read on these topics and more. I would be grateful for some of your time. Thanks
Hi Raymond – sure. Please contact me through our contact page with some details (what topics specifically, what would you like to discuss, and so on) and we can set up a time to talk. Thanks!
Rich,
I am sure if i read through the comments and questions that this has been asked. But my 5th wheel has only one battery. currently my wife and i are living full time in the 5th wheel. is it possible for me to hook up more batteries instead of just the one battery? Thank You. glad i found your website too. i was just researching water filters.
Hi Ross – yes you can add more batteries. Just make sure you connect them correctly. Also, if you add regular lead-acid batteries, make sure they’re in a ventilated compartment. If you have room next to your single battery that would be ideal. (You can put AGM batteries in a sealed compartment FYI.) I write more about all of this in my Guide to RV Batteries article.
Thank You,
I have so many questions but i will go back to water systems now… So currently we pack water in and i use a portable water pump to fill our 80 gallon holding tank. the portable pump runs about 5 GPM i see the 2 canister filter flow is half that. should i use the portable pump as is with a filter or use some sort of regulator to lower the pressure at the filter inlet?
Thank You
Hi Ross – while filling the tank it’s fine if the pump is rated at 5gpm even if the filtration is rated lower. It won’t hurt them. The filters will simply limit the flow depending on the flow rate of the filters. That said, I’d use a water pressure regulator when attached to city water, as the water pressure and flow rate is often much higher than what your portable pump is pushing.
Hi rich, very helpful article, I have a small cottage that is plumbed like an RV. The water pipes are old and plastic and the unit is winterized each year, what do you recommend to clean the lines out after antifreeze is flushed out from the 6mo winter? Thanks, Jim
Hi Jim – in general I use diluted bleach to clean out the lines. In our case I add about a cup of bleach to our 30 gallon fresh water tank, fill the tank and let it sit. Then I run that water through the hot and cold lines and let it sit. Then I run that water through the lines plus another 30 gallons or so through the system before I use it. That seems to clean the lines well – although I can still smell a little extra chlorine for the first day or so, so I wait to drink water from the system. Of course I remove water filters while doing this. In our case, the easiest way to get chlorine into the system is to put the cup of bleach right in the first canister of our water filter system, then run water through the system into the fresh water tank. I hope that’s helpful – good luck!
Rich,
I just read your article on filtration for a RV. I have some questions that I can not find the answer too. We are full time in an Allegro RED that is 35 feet. In our wet bay we have a canister filter and want to either add a water softener or a better water filtration system in it. I have looked at the PRO 10000 softener, but can not find a good replacement for my on board filter since I have limited space. Can you make a recommendation for our setup. We travel full time.
Thanks
Dan Kealy
Hi Dan – a water softener is a great idea for Full Timers – or any-timers considering how ‘hard’ the water is at most RV parks. We recently added one ourselves, and I’ll be doing a writeup on it soon. I’ve seen teh Allegro RED canister system. It’s designed for something like the Camco EVO Water Filters (http://amzn.to/2mIadjV) that has both particulate filtration (5 micron) and carbon filtration. You’ll need to replace the filters more often than in a 2 or 3 canister system, but those filters do work well. If you have room to add another canister that would be ideal, as it’s better to run a particle filter and then a carbon filter – but otherwise the all-in-one units are decent and far better than nothing at all. I hope that’s helpful, and good luck! – Rich
Thanks Rich
We are part time RV’ers and have been in places where the water is REALLY bad. Really enjoyed your info about filtration. We want to go to the next step above the Camco in-line filters so we are looking at the Camco canister or the two canister system from RV Water Filter Store. You’ve been very helpful in a “Been there drank that” kind of way LOL. Good travels.
Glad you found it useful – good travels to you, too!
Hi Rich
My water at home is treated with a water softener. Will this harm my RV’s water system, water heater, or plumbing in any way if I use it to fill up?
Hi Stephen – absolutely not. In fact, I’m adding a water softener to our RV water system this weekend. I’ll be writing a post about it soon – stay tuned.
I’m a mew RV guy looking for an answer about water filters. Should I remove my filter prior to winterizing my water system with antifreeze??? No winterizing instructions I have read even mention the filter. Thanks Gordon
Hi Gordon – Yes, remove and discard the filter before winterizing. Most (all?) filters should be replaced every season, as they grow bacteria, mold, and mildew. Even filters with KDF (anti-bacterial) should be replaced yearly.
Great post! Thanks for the helpful tips and education.
My husband and I have been living in our travel trailer for almost a year. We have well water that is horrible. It smells like rotten eggs and is mostly tinted brown, it has had some black water once or twice that only lasted a few minutes. We Don’t Use It for drinking only for showers, hand washing and dishes. My hair feels like it’s going to break off, my skin is dry. The smell has only been about the last 5 to 6 months. It smelled before but not that much. I am so confused on what system to use and how to use it? We need something inexpensive but still helpful. Any advice would be great. We don’t know where to start.
Hi Magenta – a basic canister filtration system will help with the smell. For cheap/basic, you can buy a two canister system like this one, and then use a standard particle filter (I use this 1-micron 6-pack) and a solid block carbon filter for the other canister (this 3-pack is reasonable). That will get you much cleaner and much better-smelling water for less than $130.
Beyond that you can use more filters, UV light, Reverse Osmosis and so on to get even cleaner water. I hope this is helpful – good luck!
Hi Rich,
Glad I stumbled upon your very informative article. While I don’t have an RV, I’m looking into buying an inline water filter system to add to one of my outdoor hose hookups at my house. My goal is to turn my newly acquired outdoor fish & game table with faucet/sink into a clean drinking water source. I live in San Diego, CA where the water quality is decent but not the best. I am pretty much convinced that I’d like at least a 2-stage filter system, and was eyeing the Water Sentinel WSRV-12 Two-Stage Filter as a potential option. Do you have any thoughts on this filter? I’m wondering if it might have the same or similar drawbacks as you listed about the Camco inline filter.
Thanks, Paul
Hi Paul – the Sentinel Filter you mentioned is essentially a better version of the Camco inline filter, which is why it costs more. Make sure to use a drinking water safe hose (like this one) for best results. Good luck!
Rich,
I enjoyed your video and write-up. Great job!
I’ve been leaning toward an undersink RO system for our motorhome, but am now rethinking the whole project. My question to you is this: On a scale of 1 to 10, with the water quality from a RO system being a 10, what quality are you getting from your three-filter system?
My wife is water quality obsessed, and I’m tired of hauling around gallons of bottled water. If I can achieve a respectable level of quality with a 2 or 3 filter system, I’ll do it and forget about the bottled water and RO
Thanks!.
Hi Ed- Thanks! I asked Kathy about our water quality, as I’m sure I’m biased. She said our water is ‘an 8 or a 9′ depending on the source water. I think that’s fair, as some areas have better water than others.
If you want ’10’ water, but don’t want to deal with an RO system, you could use a water distiller like this one on Amazon. We know of a few couples who use this model, and they’re very happy with the performance and water quality. We feel like our water quality is more than good enough with filtration to skip it. I hope that’s helpful – good luck!
Hi, guys.
Thank you for the information on RV water filtering, but its installation raised a few questions for me. The most critical: where does one install / insert this new water filtration system so that it cleanses water coming from “both / either” water stored in the RV’s storage tank “and” water coming from a city water input line? I thought city water line input bypasses the RV water pump and storage tank. Both water sources need to be filtered by the new water filtration system…..I think. Thanks for your help. I just purchased a 3-canister system and now need to best place it.
Cheers,
Tony
Hi Tony – I think the critical thing is that you filter the water before it enters the RV – wether that’s directly to water appliances or into the fresh water tank. In our case the water inlet is the same and it’s controlled by a rotating switch of sorts. That means the water gets filtered on the way to the fresh water tank as well as in ‘city’ water use. Assuming we regularly cleanse the fresh water tank (fill with water + bleach, let sit, flush) – the water should be fine sitting in the fresh tank, as it’s already been filtered. The filtration system also won’t remove 100% of the chlorine, so you’ll still have the anti-microbial, anti-fungal and anti-bacterial benefits of chlorine working for you.
If your RV has a different water inlet configuration (dual inlets), then you can move the hose that’s coming out of the water filtration from one inlet to the other – or use a longer hose if one of the inlets if further away – for the same result.
We also have an undercounter water filtration system – under our kitchen sink. It’s installed on the cold water line only, and it holds a combination carbon/particle filtration filter. It’s a good extra filter for drinking water as it removes most of the chlorine remnants. It’s inexpensive and you can buy one on Amazon here: 3M Filtrete Undersink Water Filtration System →
This is the most informative treatment of the subject that I have ever read, and I’ve been at this awhile. Thank you.
Thanks, Philip!
Hi Rich,
I just bought a 35′ fifth-wheel that I will be living in for the next year and a half or so. I am parked on a piece of property and connected to a well with questionable water quality. I have just been using an in-line “Camco” KDF/Carbon filter for the last month, but it absolutely kills my water pressure. I am thinking about switching to a 2 or 3-canister system for better filtration of my well water. Do you think this will help or hurt my water pressure problem?
Thank You,
Phil Gibson
Hi Phil,
It will depend a lot on what kind of pressure you have to work with in the first place. If the well water pump is only pushing 20 or 30 psi, then any filtration will kill your water pressure.
One way around that, is to fill your fresh water tank with filtered water, then use your RV water pump to supplement the pressure. It’s a bit of a work around, but it will make your shower (and sinks) useable again.
As far as adding a 2 or 3 canister system, it’s really about what filters you use. All filters have a max gallon per minute rating, and in my experience anything rated above about 3gpm doesn’t impact water pressure. Anything below that, and you’ll need to use the fresh water/RV water pump workaround to get decent water pressure.
We use a Camco Evo cannister & filter. The park we winter at in FL uses well water & the Evo filtet only lasts 2 weeks. Rather than purchasing a 2-filter system I thought we could just buy a second Camco & use a less restrictive filter for it & plumb then in line. But Camxo appears to only sell one type filler (the 5 micron one) & I can’t find a crossreference guide of f ilters compatable with the Camco Evo housing.
1. Is my idea sound?
2. What specs should I look for for the initial (less restrictive) filter?
3. How can I know what, if any, filters will cross reference to tne Evo?
Thanks
Hi Don – not sure how I missed this question, sorry for the delay. If the filters only last 2 weeks, I think you’d be much better off using standard filter housing, and two separate filters. You can buy a 6-pack of Purenex 1-Micron Sediment filters for cheap (Purenex 1-Micron Filters on Amazon), and that way you’re only throwing away a $4 filter every couple weeks instead of a $15+ filter. The second filter (carbon or KDF) will last much longer after the sediment filter, so in the long run the system should pay for itself. At least, that’s what I’d do. I don’t think there’s anything wrong with your idea – assuming you can even find a less restrictive filter – but I think you’ll still replace a lot of more expensive filters vs using less expensive and better (1 micron) filters. I also think combination filters don’t work as well as a sediment filter followed by a carbon filter. You could also use a 3-canister system, and run a 5 micron sediment first, then a 1 micron, then a carbon filter if the water is really bad. I hope that helps, and good luck! – Rich
Thanks for the hard work and presentation about water filtration. My wife and I just bought a 2015 5th wheel and will only be using it from June 1st through October 1st every year, parked in a local RV park. So, your input was very valuable, and gives me the info I need to set up the system I will need.
Many, many thanks . . . and I hope to read/see some other input you may have on other things, such as satellite systems, etc.
Thanks for your comment, Dan. The one RV product we haven’t studied much is satellite systems. My wife and I don’t watch much TV, and satellite receivers and subscriptions are expensive if you don’t use them much.
Hi Rich,
We’re a family of 3 about to being full-timing in a 5th Wheel, and for the next year or so we’ll be mostly in a park as we acclimate to this lifestyle.
I am considering using a 2-canister system, and since space is limited where I can place the canisters inside my idea is to put the canisters in a closed and sealed opaque bin outside. I’d probably put the regulator in there as well running a 10′ hose from the supply to the regulator. From the canisters, we would run the hose up into the bay to the RV.
What do you think of this setup, and would you recommend going with regular or jumbo canisters?
Thanks!
James, Cathy & Nathaniel
Hi James & Family – I’m sure your proposed setup will work well when you’re stationary for the next year. When you get traveling I think you’ll find it’s better to have fewer things to pack up and set up at your next destination. In the case of water filters, I can also see the bin getting wet, muddy, and dirty and I think it would be tricky to keep the filters clean during transport.
There are other ways you can go – for example, our RV also has an under kitchen sink filter that’s only connected to the cold water line to provide filtered drinking water. You could run a single canister particle filter outside the RV if you can fit that, then a carbon filter inside under the sink to improve drinking water taste – just for example.
I’d lean toward the regular sized canisters and filters (vs Jumbo). RVs use a lot less water than houses in general, but my bigger reasoning is that there are times we’re out of the RV for a week, and unless you use all bacteriostatic filters you’ll need to replace your filters when you do the same. By using standard filters it costs less each time.
Most filters have their usage number of gallons listed on the package – ‘up to 15,000 gallons’ for example. I estimate based on our tanks that we use 30 gallons of water a day, so at that usage a filter should last 500 days (for example). We usually replace our filters more often than that, but point being you should be fine with standard canisters with 3 people. I hope this is helpful, and good luck!
Hi Rich —
I’m using a water pressure regulator and a Camco water filter. In your experience, is there an order they should be attached to the campground spigot and hose?
Thanks in advance!
Eileen
Hi Eileen – Most people recommend attaching the water pressure regulator right to the campground spigot and then attaching the filter. The water filter will work better if it’s filtering lower pressure water, as higher pressure water will force more particles and chlorine through the filter. That setup also keeps your hose from handling continuously high water pressure and will help it to last longer. In a park with lower water pressure you may want to switch it around, as lower water pressure + the regulator + the filter will give you REALLY low water pressure in your RV. In some of those parks I skip the pressure regulator entirely.
Thank you, Rich. Makes absolute sense. I appreciate you taking the time to respond. If you have no objections, I’m going to repost your answer to my Casita group.
Eileen
Please do – and if someone has a different take on it, I’d love to hear it! :-)
Hi Rich,we just got a pro 10000 softener.do you hook the water filter for drinking up first and then the water softner? Thanks
Hi Susan – In an ideal world, you’d run a particle filter before the softener and other filtration (carbon filter) after. If you’re using a single combined filter I’d run it before. That will help the softener to work better – but I’ve heard it both ways and I think it will work fine either way.
Enjoyed the filtration video. There is a large silver colored apparatus behind you that I couldn’t identify. What is it?
Hi Fred – thanks! I suspect you’re referring to our 12.5-foot telescoping ladder. It works great – plus it packs down nice and small. You can see it on Amazon here: http://amzn.to/1zi4iDb
I was trying to read the information but the like , tweet and comment was in the center of the screen and i had to read from the bottom half only. The information you have give over the year has be very good and i like to read and watch on you tube . So i just want to say thanks and i hope you keep on doing what you do. I have a travel trailer 29′ and keep it in cape may camp ground. i have a plain to buy a class C in about two years i like the thor four wind supper C. diesel . hope to hear from you.
Hi Stephen – I emailed you directly to see what operating system/browser you’re using. It displays correctly for me, but if it’s broken for you then it’s broken for others – not good! Thanks for the heads up.
Thanks for the article.
FYI, I also got the social sharing box floating in the middle through the article.
This should be fixed – thanks for the heads up! :-)