One of the biggest complaints both Kathy and I have about RVs in general is that the design – especially on the inside – is usually out of date.
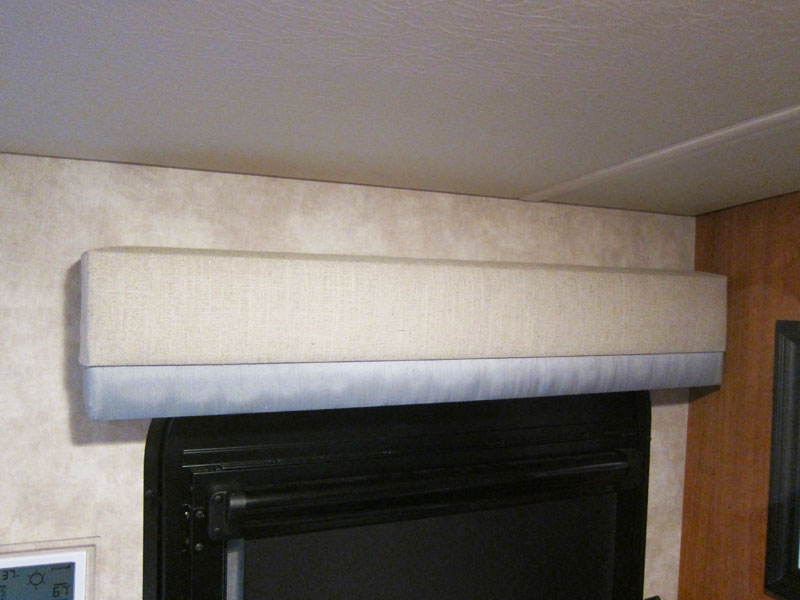
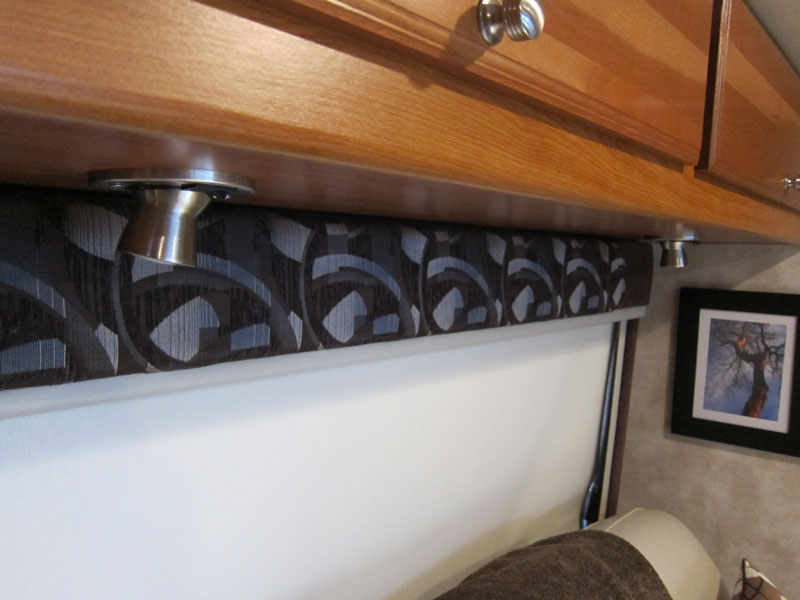
Our Winnebago is actually pretty modern looking in most respects, however the window valances that cover our shades are upholstered with a dark geometric patterned fabric that’s straight out of 1975.
After looking at the Valances for the past year, we finally decided it was time to do something about them. I took one of the valances down, took it apart, and after looking at how it was put together started re-upholstering them one by one.
I made a video to show you how I did this:
Things that I left out of the video
The silk fabric that we’re using was taken from drapes that used to hang in our (houses) windows. Instead of throwing them away or donating them we are reusing them. The fabric is silk, so a bit thinner than ideal, but I’m just using them for the strip at the bottom so they should be fine (I hope!).
Recommended Gear

This project requires fabric and a staple gun – plus short staples. Long staples will go right through to the other side – so make sure to use short (1/4″) staples. An upholstery staple gun like the one pictured here is ideal as it comes with upholstery staples. Click here to view it on Amazon.
The linen fabric was originally purchased at Joann Fabric and Crafts. They had the fabric listed for $25/yard, but they have coupons on their website that will save you 40% – 50% off your order, so we only paid $12.50/yard.
We weren’t able to get enough of the linen fabric from Joann to complete the job, so I took down the fabric info and found it online at FabricGuru.com.
Alternatively we could have ordered it through Joann, but they couldn’t tell us when we’d get the fabric (or much of anything really), so buying it online seemed like a better choice.
FabricGuru.com delivered big time too! I received my order in just a few days and was able to buy the matching fabric (exactly the same stuff) for less than $12/yard – so even cheaper than buying it at Joann with a 50% off coupon! (we are not affiliated with FabricGuru.com)
How Does It Look Now?
You can see the results in our video that shows the updated interior Here:
Short version – we’re both very happy with the Valances!
If you own an RV and would like to re-do your valances I recommend giving it a try. No sewing is required, and if you can pull fabric and use a staple gun then you can reupholster.
If you’d like your valances redone but don’t want to touch them yourself you can hire a professional of course, but you will likely pay hundreds or even thousands to have them redone professionally. This is why I decided to do them myself and so far I’m very happy with the results.
I hope you found this useful or at least informative! Until next time, happy travels.


Enjoyed the video, I have wanted to recover the valances in our 5th wheel since we purchased it. After watching you video I am sure that I can do it – I hate the fabrics that are currently covering them – as soon as I find suitable fabric, I am tackling them
Glad you found it useful – and it really is pretty easy once you get going. Good luck!
Loved this video, we have just purchased an old style treksarfarri RV and I’m about to tackle everything so I’m hoping after watching this you have lots more helpful tips but all the same thanks for uploading I’m loving it. Ps any tips on winterising the van would be hugely welcome we are British and heading to the Alps this season and we are assured this years winter should be epic but really freezing.
Happy travels both 👍😀
Hi Mandy – Glad you found the video useful! As we live in our RV full-time, we’ve never winterized it, so I can’t be much help there. We find it’s easier to drive south and stay warm! :-) Good luck in the Alps – sounds both chilly and epic. Happy trekking to you both!
I took the entire valence down. filled the holes with caulk and it really opened up my trailer.
Hi Cheryl – we probably would have done the same if it weren’t for our Day/Night roller shades. The shades are attached to the upper part of the valance. We would have had to fabricate a bracket to hold the shades, and the shade assembly isn’t very attractive. In the end, covering the valances with neutral fabric was the best way to go for us. On the plus side, the neutral fabric recedes visually, so it made our RV feel bigger.
Rich and Kathy…just took a look at the website…really nice and informative….plz keep in touch…..Ed …..Tustin…
Good job. I am about to tackle this myself. My main problem is impatience.
I loved the video..clear, concise….made it easy to understand the how to do this and they look great!
Thanks Mom! Glad you enjoyed it. :-)